I submitted a proposal last week to a lady who wanted her grey fence restored to it's original appearance. This is an easy task most DIY'ers and home owners can tackle themselves as long as they don't mind the labor involved.
How to Renew Wood Fences
I submitted a proposal last week to a lady who wanted her grey fence restored to it's original appearance. This is an easy task most DIY'ers and home owners can tackle themselves as long as they don't mind the labor involved. This potential customer showed me a proposal the other guy submitted to her and I noticed that he was going to use chlorine bleach on her fence. This inspired me to write this blog post. Do not use chlorine bleach on your wooden fences, decks or handrails. Do not bleach anything that is porous for that matter. I did a little research and noticed many of the top painting companies were offering this same service and it baffled me that even the professionals were doing things wrong.
I do not want to criticize other companies as I too was under the impression that this was the proper way to restore wood fences in the first year of my painting career. This was before I had taken a class with a mold and mildew remediation specialist.
Bleach is made for hard surfaces, hence why we use it in tubs, showers, sinks, toilets etc.. When you use bleach on a wood fence or deck it kills algae, moss and mildew but it breaks down the organic binders that hold the wood together causing damage to sound wood. Bleach on wood changes the pH from a near neutral pH to a basic pH that will damage the cellular structure. Not only is it harmful for your wood it doesn't kill the spores from which mold and mildew are created. On top of it's ineffectiveness it is bad for plants, animals & the environment.
So... If bleach is so bad, what do we use?
Sodium Percarbonate or Undiluted Hydrogen Peroxide
The sodium percarbonate is sold in tubs and can be found on Amazon. This stuff is the equivalent to OXI-CLEAN but much more potent and needs to be diluted down with water in order to spray onto the fence. I normally use a 10/1 ratio, 10 parts being water and 1 part being sodium percarbonate.
Step #1
Spray down the fence using a pressure washer to get any dirt or debris off of the surface.
Step #2
Using a pump weed sprayer that most of you already have at home filled with the Sodium Percabonate solution, spray the entire fence down. You will see a bleaching effect quite quickly. If you do not have one of these you can purchase one for fairly cheap at Home Depot, Lowe's or Amazon.
Step #3
You will need to apply a citralic acid brightener next in order to neutralize the sodium percarbonate and bring the wood back to its normal pH. This product will also open the pores of the wood and improve the absorption of our fourth and final step!
Step #4
Now that you have cleaned and restored your fence to look like new again, it would be wise to protect it from the harsh environment. A maintained fence can last a lifetime if done properly every 2-3 years. There are tons of choices out there when it comes to fence and deck stain but my favorite on the market right now is a product called Wood Defender. The product goes on better and more evenly than anything I've ever used. You can apply this product with the same pump sprayer as listed above or if you have access to an airless paint sprayer like the one I use then things can go a lot quicker. These rigs are very expensive and I would advise against purchasing one unless you have plenty of projects to justify the cost of one. The pump sprayer will work fine it just takes a little longer. Wood Defender products state that you do not have to back brush their products and I agree with them to an extent but for good measure I always use a 5" block staining brush to back brush what I have sprayed. This involves spraying an area of say 3-10 pickets depending on your speed and thickness applied then going back over the area with a brush while the stain is still wet. This will fix any runs you may have and fill in any grain you might have other wise missed and create a better overall finished product.
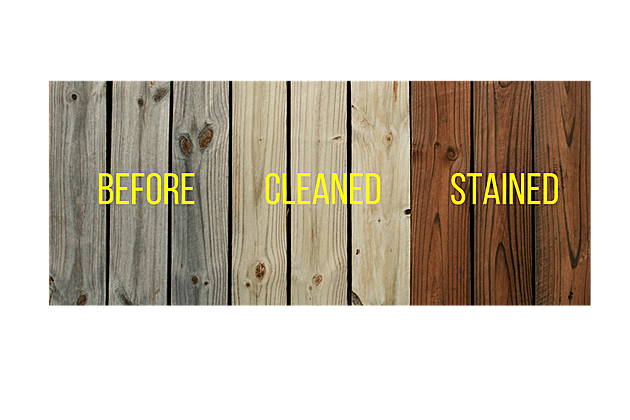
There you have it, 4 easy steps to restore an old grey fence or deck! Please comment below if you have any questions or suggestions.